You might have a lot of products for sale. And you might want to sell them. In other words, you might want to have a certain product you want to photograph. There is only one problem: you are limited in your budget to rent a professional product photographer. However, with some conventional home equipment, you can make some proper product photographs easily at home.
Why should I be able to do this?
Imagine you are having a certain product which you want to sell on an online marketplace. Now chances are that there are many like you selling the same product. What is one of the best ways to let your product stand out? Right, proper product photography! Of course there are other tips which can help you in selling online, such as those listed on here.
Making some proper product photographs
With just a simple setup, it is possible to make reasonable product photographs. For this setup, you’ll need:
- A very big sheet of plain white paper
- Some Tape
- Some kind of table, and wall or something to put the paper against.
- A camera (a pocketcamera or phone can do, but it is better if you have DSLR)
- A tripod or something else to put your camera on, such as a chair or stool.
- Optionally you could add some lamps and mirrors for reflecting the light and adding specular highlights to a product.
The image below shows a schematic overview of a possible setup (lights are optionally):
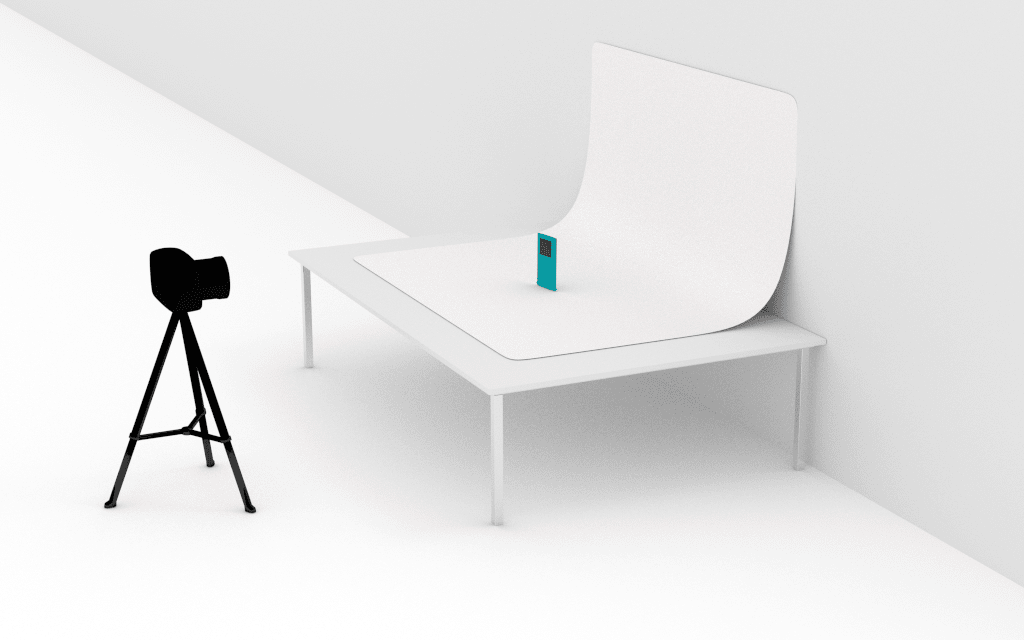
Setting up your own little studio
- Start by setting a table against a wall. This can even be an outside table and wall, which enables you to take advantage of natural lighting even better. Be careful in selecting the right spot, go for a place that is light and has a fair amount of light coming from windows. Depending on the windows location, you can adjust the position of the table to the lighting direction you prefer.
- Place the large sheet of paper on the table, eventually stick it with tape at the bottom. With a very smooth curve, let it curl up the wall and fix it on it’s top again with some tape.
- Position your product in the middle of the table, of course on top of the paper.
- Following, position your camera and tripod directly perpendicular towards your wall, so that your curved paper is exactly in line with your camera. Depending on how close you want to photograph the product, determine your distance from the product.
- This is the basic set-up. You can decide to use any (led) house-hold lamps if you want to have additional lighting from any side angle. And now it is time to start shooting!
Shooting the product photographs
Now that you have a basic set-up with a product and a smoothly curved white background (providing the paper is correctly placed), it is time to start shooting. There are however some basic tips which are important to take into account during shooting.
Lighting is key
The intensity and direction of the lighting in your set-up is the key to good results. There are some cases which are more preferable in your lighting set-up:
- Shooting outside on a little bit cloudy day can produce fairly good lighting results, without having the need for lamps and equipment. Because the lighting is more ambient in such conditions, the whole of your product receives an equal amount of light and has a nice soft dropshadow.
- If shooting inside, try to place your table next to a large window, so that your product receives enough light. Try to avoid photographing into the direction of the light, as this often results in overexposure (or simply said, to much white and ‘paleness’ in your photograph). Secondly, you can try various locations in your house to see where lighting conditions are best.
- You can play with highlights and stronger shadows by using lamps, which you direct from a certain angle at your product.
Think about (com)position
- What is the most interesting angle to photograph your product from? What details do you want to show? Try out different perspectives and angles to see what matches your product best. Some products are perfect for a photograph which directly captures their front-side (such as is often done with phones), others are more suitable for different angles.
- Although you can crop or add additional white space later in a photo editing program, it is good to think about the distance of your camera towards the object you are photographing and the position within that frame. How much white is allowed around your product? And do you want to position your product in the middle, of more to the right or left. Try out various positions to see what matches best.
- Capture details. In combination with shots which give an overview of your product, capture noteworthy details of your product. For example, if you have a fancy bag which can be closed by a certain buckle, it might be interesting to photograph that buckle up close.
In addition to former tips, it is always good to use a timer, so the blur because of camera shake is almost nullified (do not to forget to use a tripod or something stable). The mere action of your finger pushing the button can cause a little shake of your camera, which can affect the sharpness of your photograph. If you have a DSLR camera, it is preferred to shoot your images in RAW. This will give greater control in editing and correcting the images afterwards.
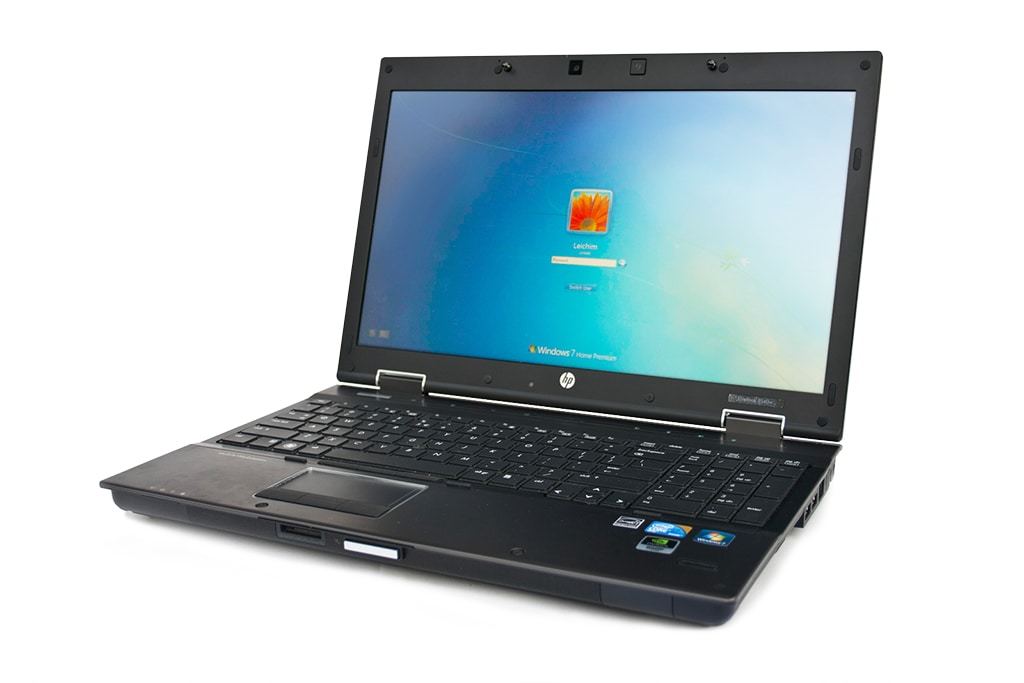
A prospect of the results
Using this technique and a little Photoshop, I made this picture of my laptop. As you can see, with a simple set-up you can achieve reasonable results.