Solidworks is a powerful application for modelling, but you might want to look to other applications for shading and rendering. In this tutorial I give a simple overview how to export a SolidWorks model to a format which can be accepted by Blender. By importing it in Blender, we can apply simulations, physical renderers and much more to the model.
Solidworks is a powerful 3D cad drawing program, used by engineers and product designers and mainly works with surfaces and curves.. Blender is one of the most popular and powerful open source 3D editors and mainly works with polygons. Using the surface modelling powers of SolidWorks together with Blender’s Cycles rendering engine is a powerful combination.
In Step 1 and 2, I will talk about modelling and exporting in SolidWorks. In Step 3 and 4 I will explain how you can import a SolidWorks model in Blender and give it a simple shader. This tutorial asumes that you have some basic knowledge about SolidWorks and Blender, and know how to use the interface of these programs.
Step 1: Modeling in Solidworks
Start up Solidworks and choose New > Part.
The Bottle
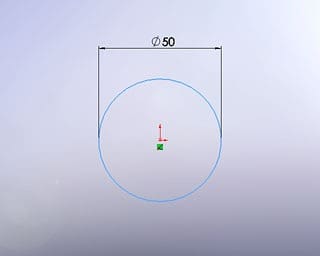
Start by making a circle sketch on the top plane, using a diameter of 50mm, as shown in the following picture. Use the Smart Dimension tool for measuring the dimensions.
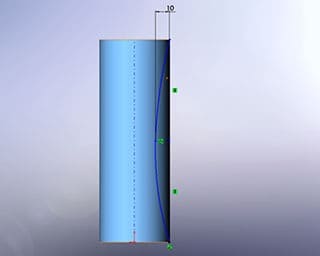
Extrude this sketch using extruded boss/base button or by insert > boss/base > extrude. Extrude 150mm, in blind mode. You will end up with a cylinder of 150mm height.
To get to the curved shape for the perfume bottle we are going to make a new curved sketch, and apply a revolved cut feature to it. Start by making a new sketch on the front plane. You can use the the example measures, but make it at least as high as the pillar we already made.
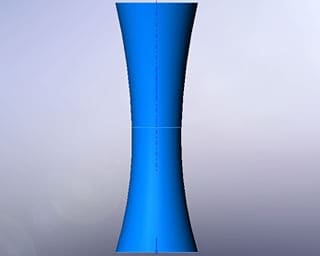
Go to View > Temporary Axes, to make the Temporary axes visible. We will use this for the cut revolve feature. Insert a cut revolve (Insert > Cut > Revolve), using the axis in the middle. Make it one direction and with an angle of 360deg. Now we get somewhere:
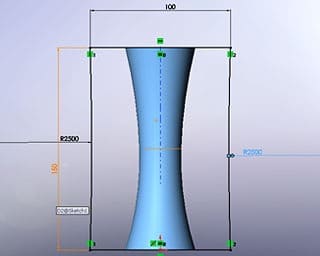
Following, start making a new sketch directly on the front plane, make it as high as the pillar, with the example dimensions as shown in the image below:
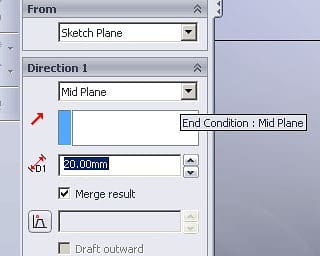
Extrude (insert > boss/base > extrude) this sketch 20mm, using midplane mode. This will extrude it from the midplane, thereby placing the extruded sketch exactly in the middle of the circle (as viewed in the image below).
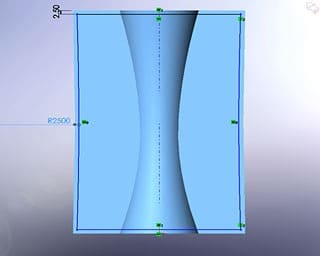
Make a new sketch on the frontplane. Make it having a distance of 2.5mm from the borders, and use a 3 point arc with a very large radius, as you can see in the picture below. Cut extrude (Insert > Cut > Extrude) this sketch, using midplane mode and extrude it over 15mm. Using this cut extrude, you have defined the inside ‘void’ of the perfum bottle.
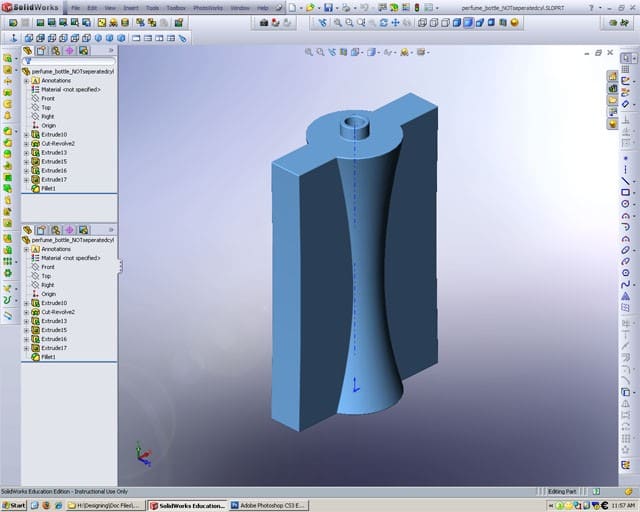
We’ll now add the last part of the bottle itself, and then continue to making the sprayer and the cap itself. Selecting the top face (do this from top view) start making a new sketch, a circle with a diameter of 15mm and with it’s midpoint right above the origin. Extrude this (insert > boss/base > extrude), blind, 7.5mm. Select from top view the top face of this just extruded circle, and draw a circle with diameter 10mm and midpoint at the same point as the previous circle. Cut extrude (insert > cut > extrude) this circle with a value of 10mm.

End up by selecting everything and apply a fillet of 0.50mm (insert > feature > fillet). You now should have something that looks like the image below:
The Cap
Start making each object by making it a new part (File > New > Part). We will assemble the three parts later in Blender.
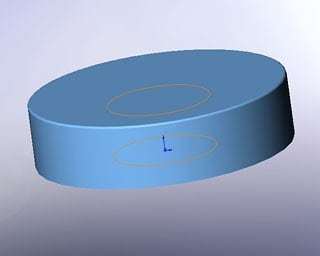
The cap itself is very simple: start by making a circle sketch with a diameter of 50mm, on the top plane. Extrude (insert > boss/base > extrude), blind, this circle 12.5mm. Sketch a new circle on the top plane, with its midpoint at the same point as the midpoint of the first circle, and with a diameter of 20mm. Cut Extrude (insert > cut > extrude) it 10mm, blind. Finaly apply a fillet (insert > feature > fillet ) of 0.50mm to the top face of the cap. You’ll end up with the model below:
For the sprayer we have to do more. Start by making the sketch (use the same dimensions) below, using line and three point arc, or circle and power trim:

Extrude blind this sketch 10mm. Start making a new sketch, a circle with the same midpoint, but with a diameter of 15mm. Cut extrude blind this sketch 5mm. Then apply a fillet of 0.50mm to the top of the cylinder.
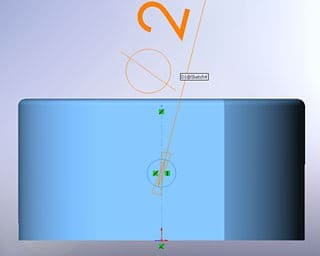
Now go to back view (or the view that that you look right up at the flat part of the extruded circle), and draw a help line in the middle from up to down. Draw a circle, having a midpoint relation with the helpline, with a diameter of 2mm. Blind extrude it 0.50mm.
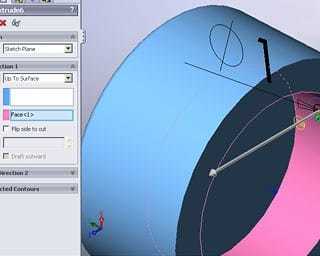
Sketch a new circle on top of the one we just made, having the same midpoint, but with a diameter of 1mm. Cut extrude this circle, using ‘up to surface’, and select the face shown in the picture below:
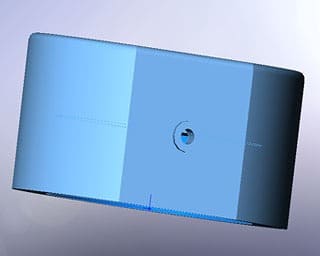
If you have done everything right, you’ll end up with something that looks like below:
Now save all the three parts you made as .vrml. This is pretty easy, just go to file > save as and where you usually save as .sldprt you can choose a lot of other formats, and choose .vrml this time.
Step 2: Exporting from SolidWorks
If we want to be able to import SolidWorks models to Blender, there is only format that can save us from utter frustration: vrml (.wrl). Fortunate enough, exporting from SolidWorks as vrml is as easy as cooking water with a watercooker (I don’t know if that makes sense, but hey, I guess you get the picture). You can export by just going to File > Save As and select VRML under save as type. If you click under options, you can determine the version and measurements. Please select VRML 97 (VRML 2.0), because this is the format that Blender can import. Export each part as VRML.
Trouble exporting? You can download the original VRML files from here.
Step 3: Importing the model in Blender:
Now that you have cooked the water (joking of course), you are able to import the vrml files into blender. And that is almost as easy as exporting them.
You just have to go to: File > Import > X3D Extensible 3D (.x3d/.wrl).
Repeat this for each model, and you have your models imported!
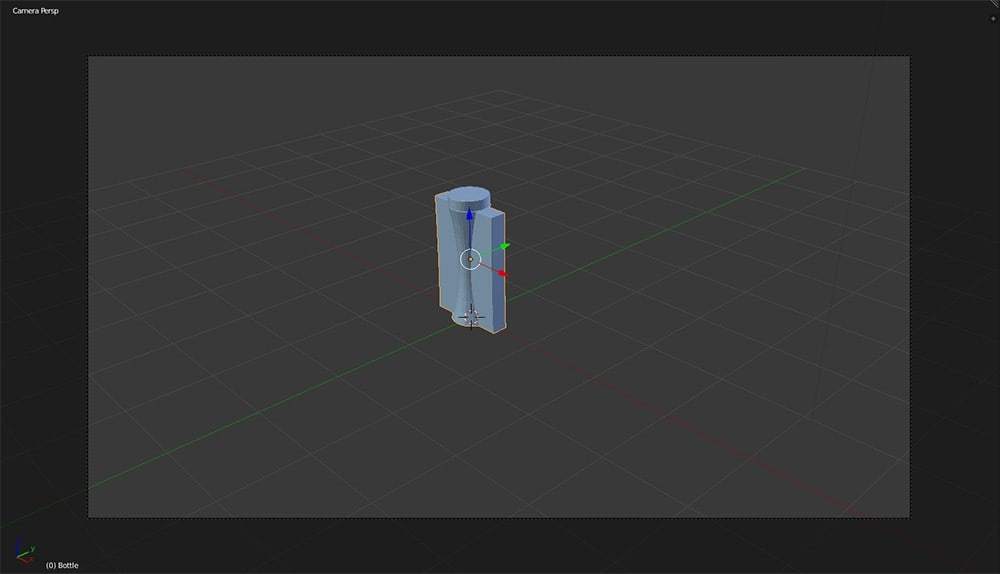
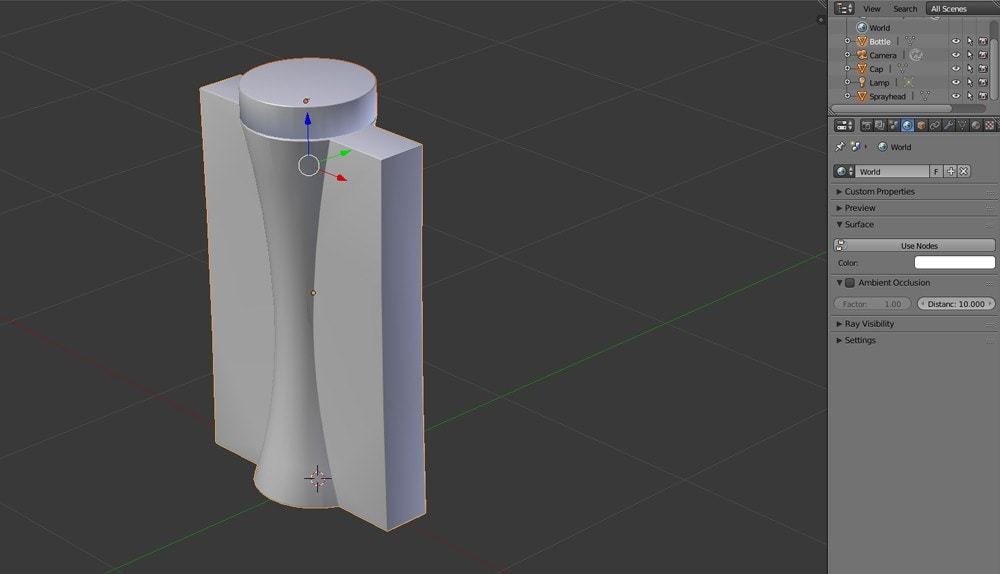
As you may notice, the models appear very small and on their sides, so scale them approximately by 10 (Hotkeys: s, then 10) and rotate them 90 degrees on the x-axis (Hotkeys: r, x, 90). Grab the sprayer and cap, and by using side and front views, place them exactly on the top of the perfume bottle. Now you can optionally add a floor (hit space: add > mesh > plane and scale it), and give it a white color, or a texture, or anything else you want.
Step 4: Shading and rendering in Blender:
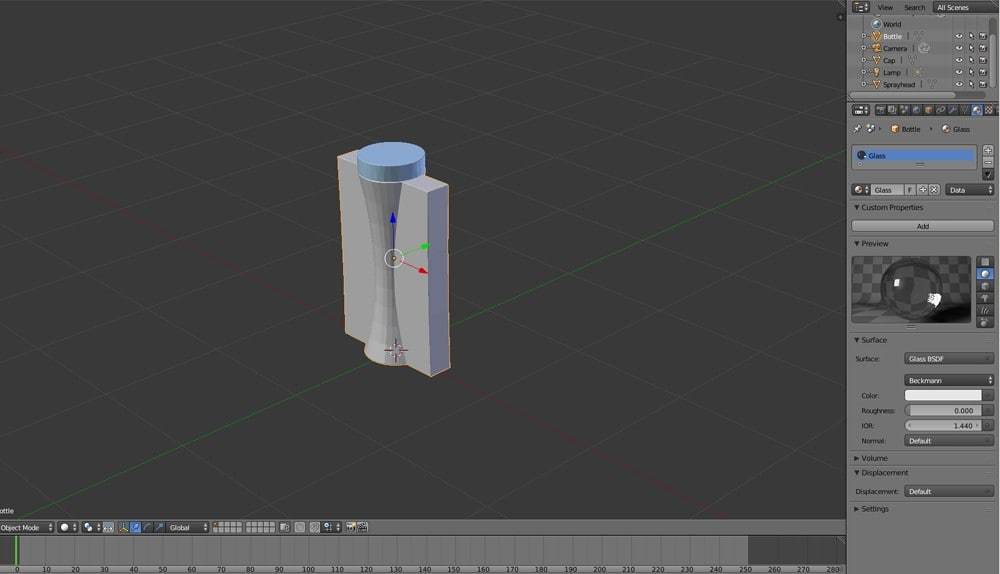
We are now ready to add the materials to the model. Select the perfume main bottle, hit f5 or the material button and add a new material. If you have not switched to cycles render yet, do it. But first, remove the existing blue material that is applied by default to imported objects. Now for the bottle, choose a Glass BSDF surface shader, which a white color and an IOR of 1.440 (the approx. IOR for glass):
For the bottle cap and sprayer, you can use a more ‘metallish’ material. I used a Glossy BSDF with a small Roughness value, but you can choose anything to like. Secondly, as I wanted the bottle to be rendered on a plain white background, I set-up a white background surface under the World Settings tab. Also see the picture below:
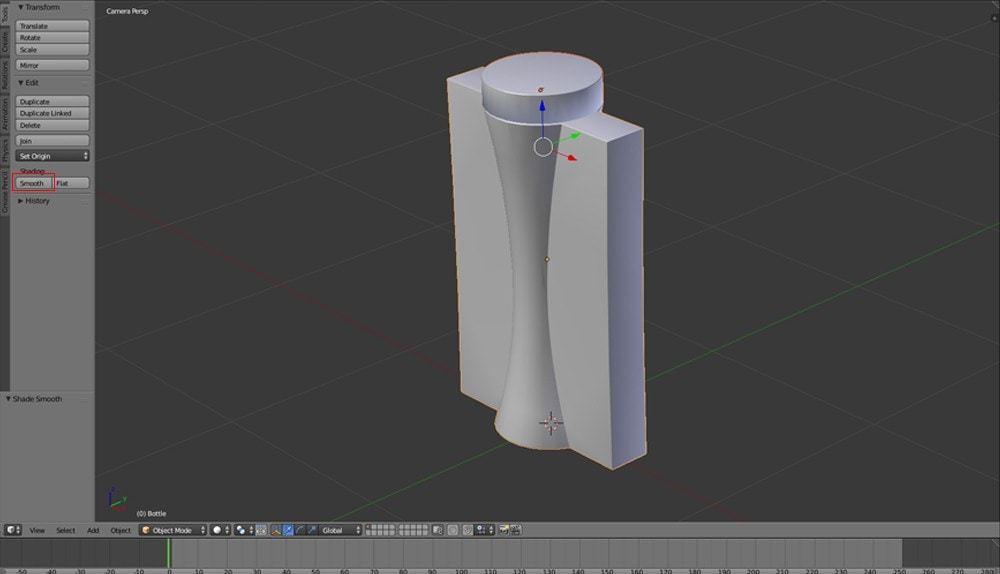
Now, do not forget to set the shading of all your perfume bottle components to smooth, as shown in the picture below:
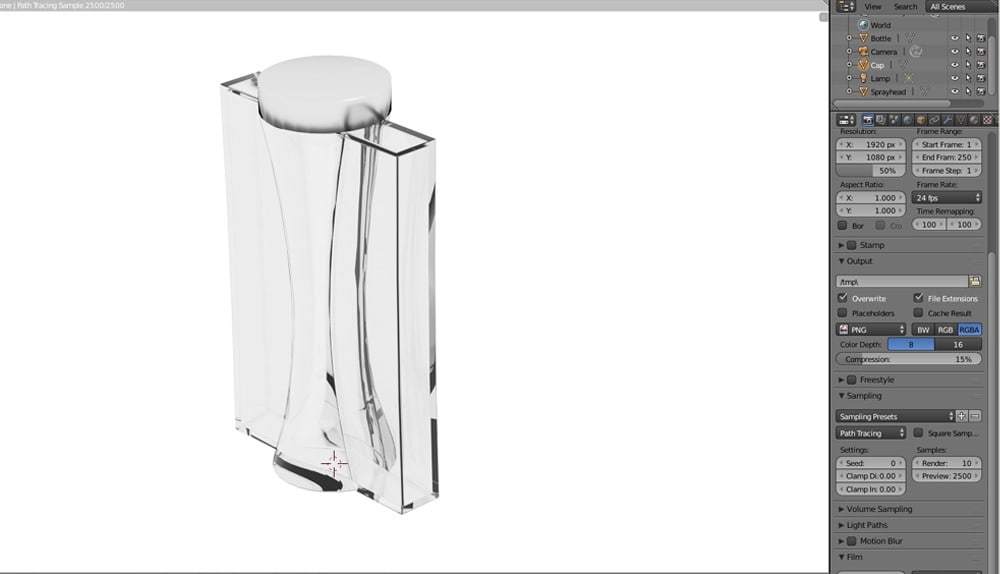
Place your camera on a good spot and Render. I cranked up the amount of samples for the preview rendered, and did a quick render y in the preview mode. And tadaaa, the following result emerged from the preview renderer:
In this tutorial, you learned to export a simple model from SolidWorks into Blender using VRML as filetype, add materials and render it using the Cycles renderer.
Questions you might have
Why should I use SolidWorks for modelling?
SolidWorks is very strong in modelling geometric, non-organic shapes with exact measurements. In many cases, I can model these kinds of shapes faster in SolidWorks compared to Blender.
Why should I use Blender, SolidWorks has a very good renderer, right?
The reason why I love Blender is that you have much more control over material properties as in SolidWorks (although this has been really improved in later versions). This also makes it more complicated though. Secondly, Blender has many more dynamic simulation options (especially with fluids and particles) which you might want to use in your product renderings. At the moment of writing this, I do not know easy solutions for rendering fluid simulations within SolidWorks.